
Woodworking for beginners - 5 basic tricks that will help you start crafting like a professional
Woodworking is awesome. You can do so much with so little and make it look so good, while having a good time. Anyone can do it. It's a matter of cutting, gluing, nailing, and screwing wood together, topped off with a finish. BUT, to do it right, ending up with a nice project takes a bit more, so we offer the following 5 basic tricks that will help you start crafting like a professional. That's what you'd like, right? You want to be proud of your woodworking projects and you'd like others to admire them and the work that you put into them. Most of all, you want to complete nice looking projects. You don't want to end up with a pile of wasted wood, with wasted time to go along with it. We don't want that to happen either, so read on.
Know Your Plans
 If you try to make a project without first closely looking over the plans then you're headed for problems, maybe even disaster. Carefully go over the plans, familiarize yourself with the process and tools needed. In addition, look over the dimensions very carefully. Occasionally a key measurement is left out. I know, I've seen this in plans in magazines and the following issue has the missing measurement and an apology printed. It's frustrating to be in the middle of a project and not be able to move forward. Looking through the plans will also give a good idea as to whether or not the project is within your level of ability. You don't want to get in too deep and not be able to finish.
Have the Right Woodworking Tools
Looking over the plans will give you an idea of what tools are needed. Having these handy helps the project go together smoothly. If you need to make dados, you're going to need tools that will get the job done. This can range from a knife and a chisel, to a router and bit, a circular saw and guide, or even a table saw or radial arm saw with a dado head. Let's face it - You can't cut a dado with a hand saw. Well you could try, but it would be time consuming and very frustrating. Woodworking is supposed to be fun and relaxing. Having the right tools when needed will help make it so. 
Choose the Right Woods/Materials
This tip might sound out of place, but over the years I've seen projects that have been made with wood that just wasn't right for the project. Have you ever seen what could be a nice project done out of standard plywood, complete with defect plugs and such? I have. Shame, as the projects was nicely crafted and would have looked SO much better if done out of hardwood. On the other hand, there's no need to use nice Oak or Walnut plywood inside a cabinet or piece where it won't be seen. Cabinet grade maple or birch will do the job and will cost less. When mixing wood types in a project, be aware of how the grains and colors go together. I recently was a piece done in two highly contrasting colors, which did not complement each other.
Be Accurate
Accuracy is a must in woodworking, both in measuring pieces and cutting parts. How accurate do you need to be? It depends upon the size of the project. Larger projects are more forgiving of inaccuracies. You can be 1/16" even 1/8" off in carpentry projects without any issues. Try that when making a nice jewelry box. Nope, it won't work, especially when you're cutting and assembling mitered sides. Matching sides MUST be the same size. Even 1/32", and sometimes 1/64", will throw things out of whack. Accuracy is not only important in making accurately measured cuts, but also in placement of cuts. I'm guilty of cutting the grooves on the wrong edge of parts. There's nothing like finding the groove in one piece of a frame on the wrong edge, especially if you don't have any extra wood on hand.
Finish the Piece Properly
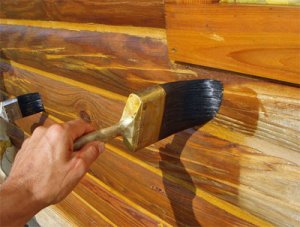 I've seen many a nicely made project with runny clear coat or blotchy stain. The finish can really make or break the quality of the piece so it pays to work for as nice a finish as possible. Take time to completely sand all parts, making sure to sand with the grain. If you're using an orbital sander, move it slowly enough not to leave swirl marks, which also detract from a niece piece. If brushing your finish, do so with the grain. This will help hide brush strokes which enhances the quality of the finish. Speaking of stains, some woods don't take liquid stains very well. This is when a gel stain works best. Also, some stains simply deposit pigment on top of the wood, not soaking into open grained wood. Dies and gel stains will help in these situations. Working to make your finish as smooth as possible will mark you as a craftsman. People like to rub nice looking projects, enjoying the smoothness and warmth of the finish. Sometimes applying the first coat of a finish will make wood grain stand up, leaving a rough texture. Dampening the surface and then sanding before applying the finish will result in a smooth finish. Final note: I didn't mention safety or keeping a clean and neat shop, as those won't really help you become a craftsman. They will help keep you safe and make it easier to work, but not produce nicely finished projects; keeping the five tips in mind will. So, now head out to your shop and make some sawdust, and a really nice project. About The Author: Paul is a woodworking enthusiast and the editor-in-chief of Woodworkboss.com. Through his site, he aspires to help fellow hobbyist to pursue this relaxing hobby and shares some helpful tips to make the woodworking venture easier.