
How to Turn a Door into a Desk
Follow this easy guide to turn a door into a desk. We recommend recycling your unused door or looking for one on Freecycle or Craigslist before buying a brand new one. Let's save the planet one door at a time!

Polished Chrome Table Legs and a Recycled Door
What you will need:
- Desk legs
- A flat door (consider recycling one!)
- Electric Drill
- Flathead and Phillips-Head Bits
- 1/16"" Drill Bit
- Flathead Screwdriver or Chisel
- Tape Measure
- Marker
The first step to creating your do-it-yourself desk is to remove the hardware from the door. Or, simply leave the hinges on the door for a unique-looking desk. The screws on the door handle may be placed in several different configurations, so determine which tool is needed, and always use the best tool for the job. The resulting hole can be used for wire management.
For a modern looking desk with a minimalist feel, chose desk height metal table legs in a polished chrome finish. These legs are sturdy and have individual levelers to compensate for any uneven flooring surfaces. They are very easy to install and come with a square mounting plate and screws. The legs can be easily removed if you need to store the desk, or turn it back into a door.
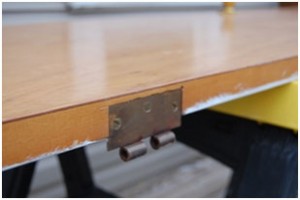
To install the desk legs, first decide how much overhang you would like. Depending what type of material your door is made of, whether it is solid wood or a hollow core door, will determine how much weight it can handle. We recommend no more than a 12"" overhang length-wise for an 80"" table. We installed our mounting plates at 8"" from the edge of the door to the edge of the mounting plate, which provided about 9"" of overhang. Having too much overhang would cause the mounting plates to be too close together and could cause instability. We installed our mounting plates 1-1/2"" from the edge of the door to the edge of the plate.

Ensure proper leg room and symmetry
Mount the plate with some overhang
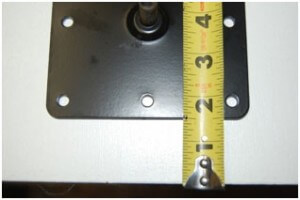
Mark each drill hole with the marker to align the plate. Set the mounting plate aside and use your drill with 1/16"" drill bit and drill 1"" pilot holes. This will make mounting the plate with the screws much easier.
Next take your mounting plates and line them back up with your pilot holes. Use the provided screws to mount the plates securely to the door using your drill. Once the mounting plates have been secured, grab one of your legs. On one end of the leg there will be a plastic leveler and on the other end- a threaded bolt. To attach the leg, simply place the male end of the threaded bolt into the female end on the mounting plate and twist the leg until tight. Repeat this for all four legs.
Flip your desk over onto its new legs. Check for any wobbling and adjust the levelers by screwing them in to make the leg shorter and out to make the leg taller. The levelers provide up to 1"" of adjustment.

Collapsed leveler with polished leg

Extended leveler with polished leg
UPDATE: This Project was featured in a My Home My Style Blog!